When it comes to cheaply using 16mm film I think the two hard parts are developing and telecine. Hand processing is difficult without a decent daylight tank. Here are some of the tanks that I have used in the past and what I currently use.
I am lucky to have inherited a good bit of old photography stuff. Both of these tanks were used by my grandfather many years ago. The square tank is a 4×5 cut film tank that will work for processing super 8 or you can stuff maybe 1/3rd of a roll of 16mm in there, but it won’t turn out very well.
Once I really started working with 16mm I really needed a bigger tank and I pick up one of these on ebay. It’s a Jobo 2800 system tank that is made for paper developing. It worked alright until the top lip on the tank started to deform. I replace the drum, but I still don’t like how delicate the tank is, so I started to think about making my own.
So I headed off to the lumber yard and started to stalk the plumbing section. I bought a piece of 6″ pvc pipe and various fittings.
The tank turns out to be light tight and pours just about as fast as the Jobo tank. The top seemed just a little too complicated. So I kept going.
This is where I would recommend people start if they want to make an easy and inexpensive tank. The top is much easier than my previous version and work almost as well. The only issue I have had is that sometimes an end of the film wants to pour out with the liquids. A quick inversion while pouring will remedy the situation. It is made from 1 foot of 6″ pvc with two caps and 4 – 1″ schedule 40 street elbows. I drilled a single hole in the top cap to fit the outer diameter of the elbow and glued it all together.
The 6″pvc tank body does need to be sanded down a bit so the lid does not stick on too tight. Also you might noticed that I didn’t bother to paint the body, I found the plastic thick enough to block light (ymmv). The 6″ pipe sections are about 10″ to a 12″ long making the tank just the right size for a 100′ roll of film with a little wiggle room. I have used the tanks many times and they have proven quite easy to use, cheap and durable.
Recently Jason in South Wales was asking for advice about developing KODAK WL Surveillance Film 2210.
Here is what he has tried:
I have made a few tests with Ilfosol3 I have attached a small screen shot of a scan. I loaded 6ft into a small spiral inversion tank, 2.5ml of Ilfosol3 and 160mm of water, 20 degrees, pre soak around 2minutes, 6mins developing, fix 5 minutes or so, wash 30 mins. but the problem was that only 1ft out of the 6ft developed the rest of the negative was very faint and couldn’t be scanned.
Well, it looks like he is off to a good start at least with the one foot that came out. I am guessing the stuff that came out too faint was just not fully submerged in developer. I am waiting to hear how it turns out.
Color Intermediate film like 7243 and 7244 — If you are interested in buying some of this film you can find it on my ebay page.
Regular color films like ektachrome and fuji color films
Black and white films like tri – x and plus x
Film this will not work with: Kodachrome
What kind of dark room will you need:
Just someplace truly dark, a photo darkroom or even a dark closet – room at night.
You will need a laundry or kitchen sink
You will need 2 or 3 one gallon plastic pitchers for mixing your chemicals.
You will need a Dark tank or you will have to do the whole process in the dark.
You will need some place to hand the film to dry.
You will need a simple timer, 5 minutes will work well.
You will need 2 or 3 chemicals for this:
Prewash Borax – 50g of 20 mule Team Borax from Walmart will work fine. This is optional if you are not processing a film with a remjet coating.
Dektol Developer – you will need 25g per 100’ of film.
Simple fixer – you will need 70g of sodium thiosulfate penta.
Water
Now we have everything we need – lets get started.
Step 1. Mix your chemicals
In each one of your pitchers put about 1 gallon of approximately 100 degree water.
and pour in each of your chemicals into a separate pitcher – it is best to have your
pitchers marked, so you don’t mix them up. Give them a stir or two. We will let this
dissolve while we work on the next step.
Step 2. Loading the film in your dark tank.
We need to load the film into our dark tank in a darkroom or dark closet.
The film needs to be spooled off of the reel and gathered into 3 or 4 foot loops and then
stuffed into the tank so as little of the film touches itself as possible. When it is all stuffed
into the tank close it up.
Step 3. Let’s get developing.
If you are developing a remjet coated film, we are going to start with a borax prewash.
Pour your borax prewash into your tank and agitate for about one minute. You can let
the tank rest for one minute then give it a shake and pour out the prewash. This step
is not time critical, if you have a stubborn remjet coating then you can agitate it more
or let is soak a little longer. As you pour out the prewash, it should have a lot of remjet
in suspension so the water should look dark purple or black.
Step 4. Rinse (optional)
Fill up the tank with room temperature water and pour out.
Step 5. Developing bath
Pour your developing solution into the tank and agitate for the first minute.
Agitation helps eliminate adhesions in the film that will cause the film to not get
developed in certain areas. After the first minute then you can just give it a shake for 10
seconds every minute or so. Develop for 5 or 6 minutes. This is a good starting point
for development, you may need to go longer for some films or for underexposure.
Pour out developer.
Step 6. Rinse
For a stop bath we are just going to fill the tank with room temperature water again,
give it a shake and pour it back out.
Step 7. Fix
Pour the fixer solution into your tank, and give a shake or two every minute.
After 4 minutes you can take the lid off the tank and see what you have.
If parts of you film have a milky look to them then pull the film a little out of the
tank and rotate and stuff it back into the fixer. Check for adhesions and pull them apart
before putting the film back in. Then wait until it is uncloudy.
Now you can pour the fixer out.
Step 8. Final Rinse
Put the tank under the faucet and run water over the film for 5 minutes or so.
If you want to be very sure you get all the fixer out then you will need to use a
hypo clearing bath (very optional). As the water is running over the film you can
check for any remaining remjet and gently rub it off with your fingers.
Step 9. Photoflo (optional)
If you want to avoid water spots then this would be the time to put a little photoflo
or similar into your rinse tank.
Step 10. Untangle the Film
Now you can pull the film out of the tank and untangle the ball. After untangling
the film you can run it through your fingers and squeegee most of the water off.
You can even you a cloth to help dry it a bit.
Step 11. Hang the film to dry
Notes: This develops the film as a negative, so if you are developing reversal films like tri-x or plus-x they will be negative not positive. Colors films will be black and white negative with an orange mask. If you use this method on fast films they will be extremely contrasty and grainy.
I love the idea of hand processing and I like the look. In an upcoming post I will describe my hand process method in detail. Here are some links I used to get started.
Some of these links were so old that they were dead but fortunately archive.or to the rescue!
Film: I have used several different kinds of 16mm film but mostly I use a color intermediate film Eastman 7243 that was not intended to be shot in a camera but used to make duplicates of negatives. This film I rate at asa 12 or asa 6 depending on the situation. This film allows me to use a relatively open aperture on my camera and shoot in bright sunlight. It is low contrast and has a very fine grain. But the real reason I use it … It is really cheap.
Camera: My current go to a Bolex H16 reflex camera. It is reliable and easy to use. The reflex aspect is very nice, I like having my subject in focus. I also use the Filmo 70a for fun or in situations where I don’t want to risk damaging the Bolex.
Camera Settings: I almost never use a light meter. I use the sunny 16 rule and adjust to my situation. Let see – it is sunny and the film is 6 Asa and my shutter speed is twice the reciprocal of my frame rate, so 1/48th of a second – hmmm 6 – 12 – 24 – 48 so I should open up 3 or 4 stops from f/16. It is a lot quicker if I just call it the sunny f/5.6 rule. Of course if I can’t open up enough I can always slow the frame rate down and get an extra stop or two. Anyway this works and once you get used to it, it is pretty quick.
Processing: Again, I am cheap and I like to do stuff myself, so I process everything myself. I don’t like complicated either so I do a very simple hand processing method using the least equipment and chemicals possible. I process in a hand made dark tank. It is a simple affair that is easy and cheap to build. The film is spooled off the daylight reel in a dark room and bunched up and stuffed into the dark tank. Then the film gets a quick wash in a warm borax solution for a couple of minutes, then a rinse in water, a 5 minutes develop in dektol, then a rinse, then a 5 minute soak in fixer and then a final rinse. Let the film hang dry for an hour or two and it’s time for spooling and digitizing.
Digitizing: I fought with this step for quite a while. At first I bought an old B&H projector and just projected the reel and shot the result with whatever camera I had laying a round. But I was unhappy with the results. You can never get the shutter of the camera and projector to line up and the rate was always off, a bad flicker is the result. I tried several methods before I settled on my current setup. I took another old 16mm projector and retrofitted it with a stepper motor drive and a microswitch on shutter. So I can control move the film slowly and precisely through the projector. I also changed the light source to a LED bulb with a diffuser. I use a Canon G5 camera that is aimed back into the lens to individually capture each frame as a high resolution image. It take a couple of hours for the rig to run through and capture a single 100′ of film but I like the results much better. Digitizing one 100′ reel leaves me with about 4000 – 1.5mb images that crop down to a 1600×1200 image so I can do a 1080p movie without losing quality.
Editing: I take the images and drop them into Avidemux for initial processing. This program allows me to crop, rotate, invert the negative and color correct all in one pass. The output can be any number of formats including uncompressed avi’s to highly compress mpeg4’s. I take these files and load them into Sony Vegas pro for the final editing to a youtube or dvd type output.
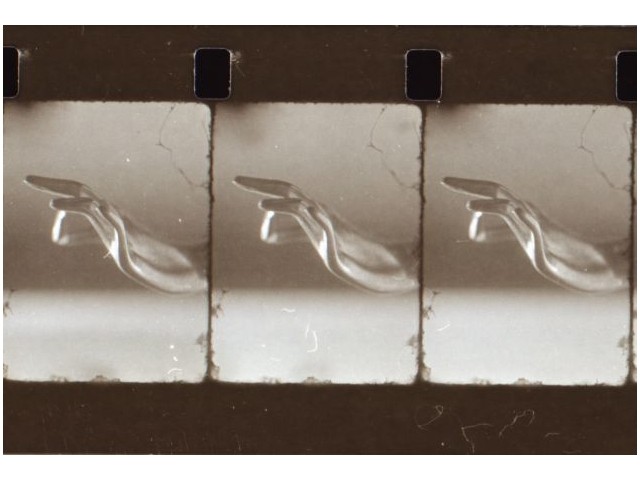
Here is a quick example of what the files look like before and after processing.
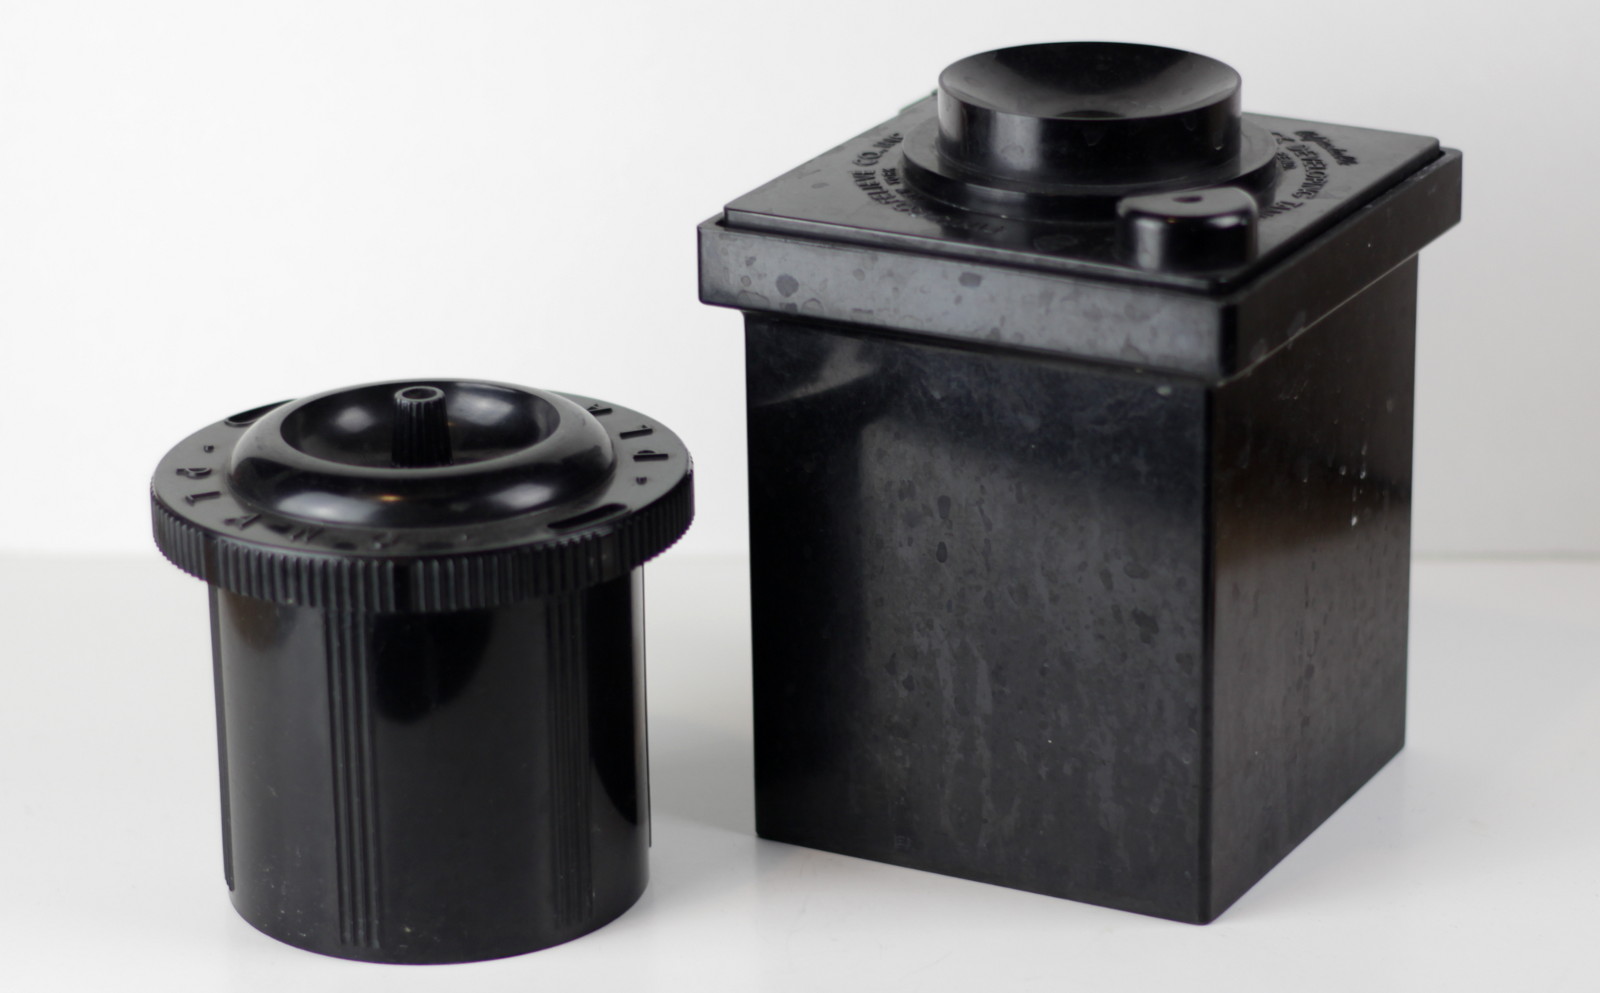 I am lucky to have inherited a good bit of old photography stuff. Both of these tanks were used by my grandfather many years ago. The square tank is a 4×5 cut film tank that will work for processing super 8 or you can stuff maybe 1/3rd of a roll of 16mm in there, but it won’t turn out very well.
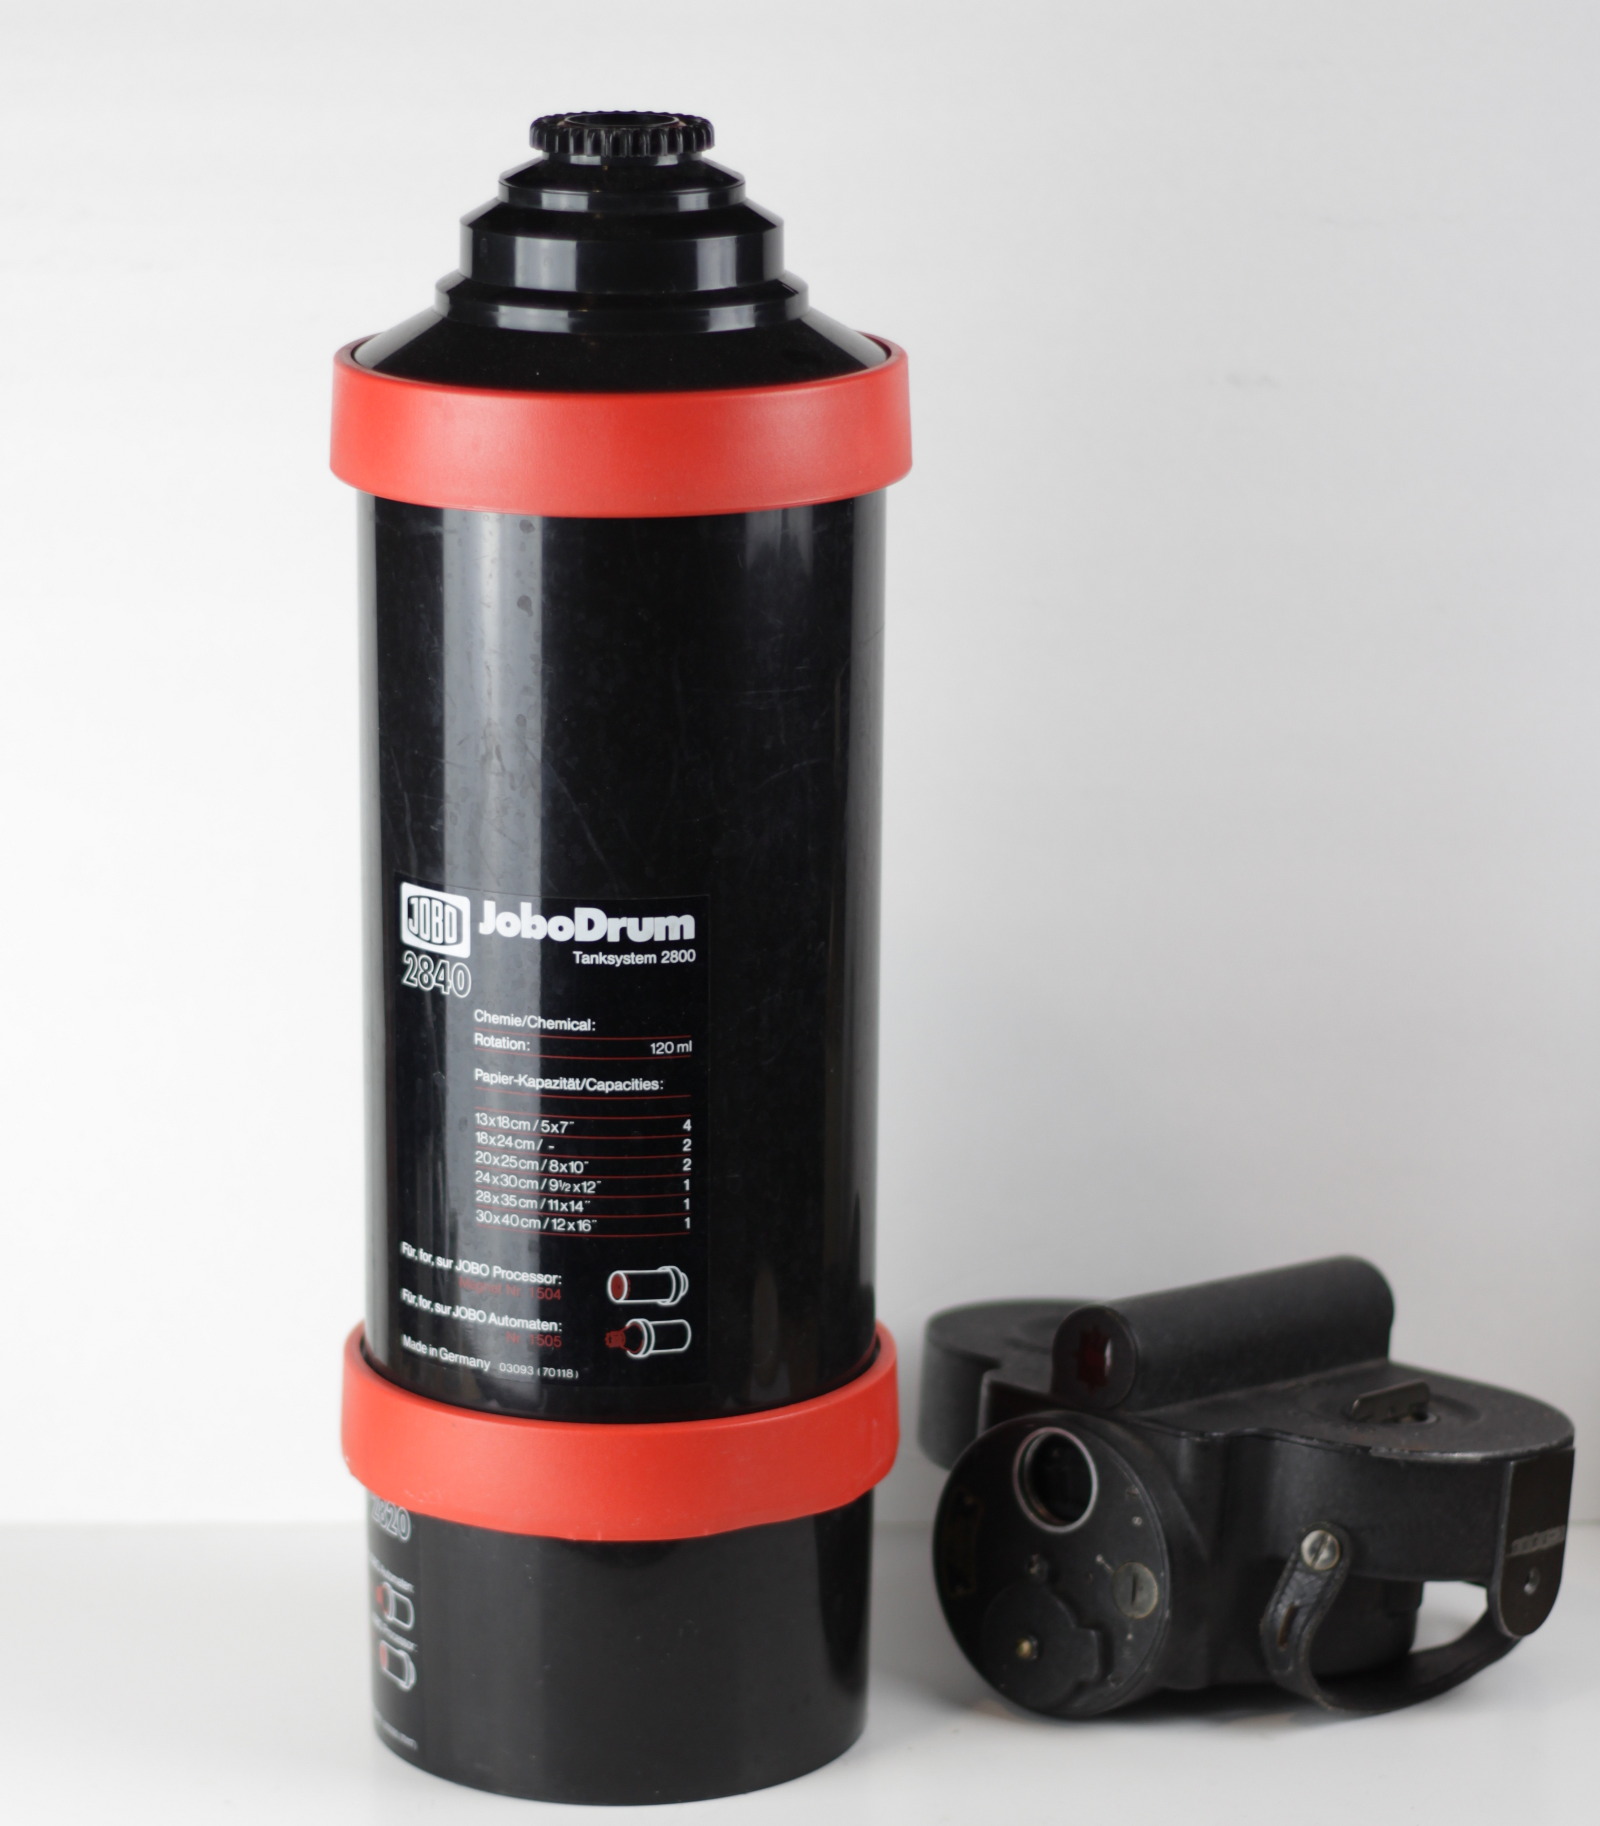 Once I really started working with 16mm I really needed a bigger tank and I pick up one of these on ebay. It’s a Jobo 2800 system tank that is made for paper developing. It worked alright until the top lip on the tank started to deform. I replace the drum, but I still don’t like how delicate the tank is, so I started to think about making my own.